Artificial Intelligence and ML apps are becoming more pervasive in our everyday lives. They can be used for many different use cases, for instance Virtual personal assistants, Commuting Predictions, recommending products, security, etc. Working in the background, they can provide us with help even when we are not aware they are there. I am sure most of you reading this blog might have received a notification on your mobiles on the best time to leave work based on traffic conditions from various map applications. Or you might have received product recommendations based on your previous purchase pattern.
Machine learning applications are rapidly entering our daily lives as technology advances toward providing smartphone mobile-centric solutions. Social Media platforms like Facebook, Linkedin, Instagram, etc are experiencing a rapid progression in recent years. The smartphone's power, productivity, and value must exceed the buyer's expectations to be a successful product. Certainly, this trend paves the way for a need to have a more advanced mobile app, which can provide heightened performance without requiring too much space or power.
In this article let us discuss Machine Learning on Mobiles its architecture and deployment along with one of the most used libraries for on-device Machine Learning i.e. Tensor Flow and its features. But before we actually look into its architecture and deployment. Let us first try and understand why Mobiles.? Because mobile phones are accessible to most people worldwide and most of us have one in our pocket. Also, in this article, we will look into movie recommendation systems using TensorFlow Lite and Firebase codelab.
 |
| IMAGE 1: REVAMPING THE USAGE OF MOBILE APPS |
Today we are living in a world of mobile applications. They have become such a part and parcel of our everyday lives that we are dependent on mobile apps for almost all our needs starting from our daily needs like groceries, and food delivery to booking our year-end favourite holiday spot.
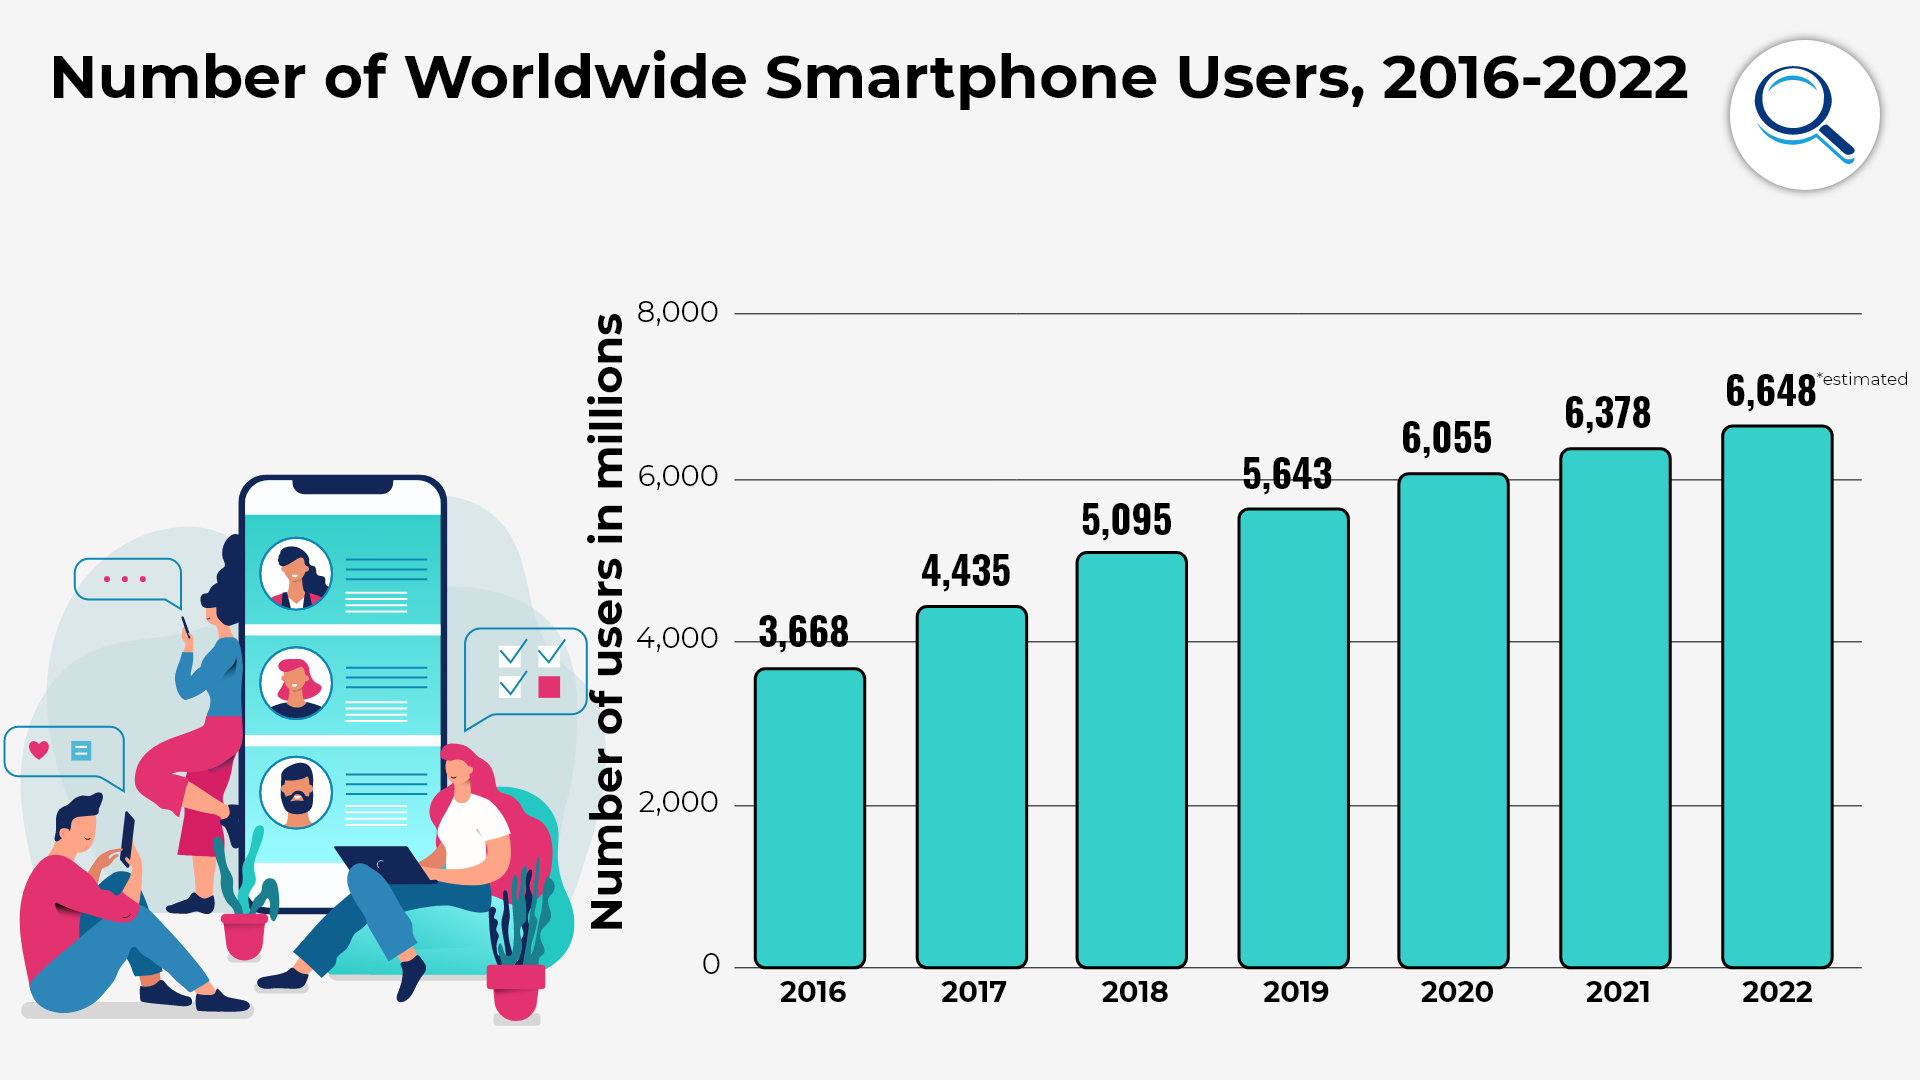
We are also seeing that the global smartphone penetration base is increasing exponentially. Smartphones have replaced Personal Computers as the most important smart-connected devices. Innovations in mobile, new business models and technologies in mobile are transforming every walk of human life.
 |
| IMAGE 2: NUMBER OF SMARTPHONE USERS WORLDWIDE |
 |
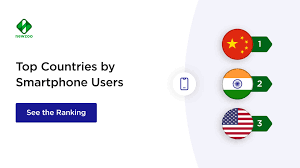
| IMAGE 3: TOP 3 COUNTRIES BY SMARTPHONE USERS |
Why Use Machine Learning on Mobile Devices?
The current trend suggests that the implementation of Machine Learning on mobile devices for app development is gaining popularity. Despite being traditionally associated with computers, modern mobile devices are equipped with high processing power, enabling them to perform tasks with the same level of effectiveness as computers.
Some classic examples of Machine Learning on Mobiles are as follows:
1) Speech Recognition
2) Image Classification
3) Gesture Recognition
4) Translation from one language to another
5) Robotics Patient-Monitoring Systems
6) Movie Recommendations
Ways to implement machine learning in Mobile Applications:
The following are the four main activities to be performed for any Machine-Learning problem.
1. Define the Machine Learning Problem
2. Gather the Data Required
3. Use the data to build/ train a model
4. Use the Model to Make Predictions
 |
| IMAGE 4: STEPS TO IMPLEMENT MACHINE LEARNING IN MOBILE APPLICATIONS |
Utilizing Machine Learning Service Providers:
There are many M.L. Service providers which we can utilize for building Machine Learning Models on Mobiles. The following is a list of some of the service providers. The list is on an increasing trend day by day.
Google Cloud Vision
Microsoft Azure Cognitive Services
IBM Watson
Amazon Web Services
Steps Involved in building a Machine Learning Model
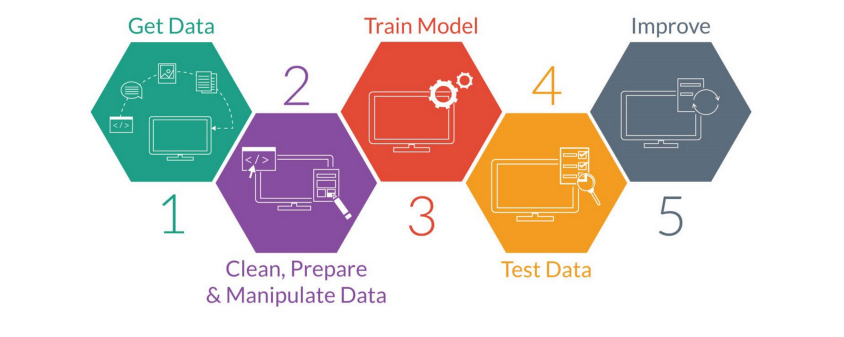
The below diagram will summarize the steps involved in building a Machine Learning Model in Mobile Application development.
 |
| IMAGE 5: STEPS INVOLVED IN BUILDING A MACHINE LEARNING MOBILE APPLICATION |
Add Recommendations to our app with TensorFlow Lite and Firebase:
Recommendations allow apps to use M.L. to intelligently serve the most relevant content for each and every user. They actually take into account past user behaviour to suggest apps content the user might like to interact with in the future by using the model trained on the aggregate behaviour of a large number of users.
We will try and learn in this article to how to obtain data from the app's users with Firebase Analytics, build a Machine Learning model for recommendations from that data, and then we will also use the model in an Android app to run inference and obtain recommendations. Our objective is to create a model that can recommend movies to a user based on their past movie preferences. The model will analyze the user's list of previously liked movies to determine which films they are most likely to enjoy watching in the future.
What we will Do?
Step 1: Integrate Firebase Analytics into an android app to collect user behavior data.
Step 2: Export that data into Google Big Query
Step 3: Pre-process the data and train a Tensor Flow Lite recommendations model
Step 4: Deploy the Tensor Flow Lite Model to Firebase ML and access it from your app
Step 5: Run on device inference using the model to suggest recommendations to users.
What we will Need
1. Android studio version 3.4+
2. A test device with Android 2.3+ and Google Play services 9.8 or later.
3. If using a device a connection cable.
Now let us discuss each step in some detail.
In order to get the sample code from GitHub you may use the below code.
https://github.com/FirebaseExtended/codelab-contentrecommendation-android.git
The above code has two repositories which contain two folders:
1. Start- The starting code that you will build upon in this code lab.
2. Final- The complete code for the finished sample app.
From Android Studio, select the codelab-recommendations-android directory from the sample code download. (File > Open > .../codelab-recommendations-android/start).
We will now have the start project open in Android Studio.
Step 3: Create a Fire Base Console Project:
Create a new Project
1. Go to the Firebase Console
Select Add Project (or Create a Project if its the first one)
Select or enter a project name and click continue. Ensure to 'Enable Google Analytics for this project' is enabled. Follow the rest of the setup steps in the Firebase Console, then click create project or you can also add Firebase if you are using an existing Google Project.
Step 4: Add Firebase
From the overview screen of your new project, now click on the Android Icon to launch the setup workflow.
Enter the code labs package name com.google.firebase.codelabs.recommendations, Now select Register app.
Add google- services.json file to your app
After adding the package name and selecting Register click on download google-services.json to obtain your Firebase Android config file then copy the google-services.json file into the app directory in your project.
After the file is downloaded you can now skip the next steps shown in the console.
Add Google Services plugin to your app:
The google-services plugin uses the google-services.json file to configure your application to use Firebase. The following lines should already be added to the build .gradle files in the project.
app/build.grade
build.grade
Sync your project with gradle files:
To be sure that all dependencies are available to our app, we should sync our project with gradle files at this point. Select File> Sync Project with Gradle Files from the Android studio toolbar.
Run the Starter App:
Now that we have imported the project into Android studio and configured the google-services plugin with your JSON file, we are ready to run the app for the first time.
Now connect your Android device, and click Run ( execute.png) in the Android Studio toolbar.
The app should launch on the device. At this point, we can see the app that shows a tab with a list of movies, a Liked Movies Tab and a Recommendation tab as can be seen in the below screen shot.
Download the Model in your APP:
In this step we will modify our app to download the model we just trained using the Firebase Machine Learning.
Adding Firebase ML dependency:
The following dependency is needed in order to use Firebase Machine Learning Models in our app. It should already be added.
app/build.grade
implementation 'com.google.firebase:firebase-ml-modeldownloader:24.0.4'
Downloading the Model with Firebase Model Manager API:
Now let us dump the code below into RecommendationsClient.kt to set up the conditions under which model download occurs and create a download task to sync the remote model to our app.
RecommendationClient.kt
private fun downloadModel(modelName: String) {
val conditions = CustomModelDownloadConditions.Builder()
.requireWifi()
.build()
FirebaseModelDownloader.getInstance()
.getModel(modelName, DownloadType.LOCAL_MODEL, conditions)
.addOnCompleteListener {
if (!it.isSuccessful) {
showToast(context, "Failed to get model file.")
} else {
showToast(context, "Downloaded remote model: $modelName")
GlobalScope.launch { initializeInterpreter(it.result) }
}
}
.addOnFailureListener {
showToast(context, "Model download failed for recommendations, please check your connection.")
}
}
Tensorflow Lite runtime will let us use our model in the app to generate recommendations. In the previous step, we have initialized a TFlite interpreter with the model file we have downloaded earlier. In this step, we will first load a dictionary and then labels to accompany our model in the inference step, then we will add pre-processing to generate the inputs to our model and post-processing we will extract the results from our inference.
Load Dictionary and Labels:
The labels which we have used to generate the recommendation candidates by the recommendations model are listed in the file sorted_movie_vocab.json in the res/assets folder.
Now copy the following code to load these candidates.
/** Load recommendation candidate list. */
private suspend fun loadCandidateList() {
return withContext(Dispatchers.IO) {
val collection = MovieRepository.getInstance(context).getContent()
for (item in collection) {
candidates[item.id] = item
}
Log.v(TAG, "Candidate list loaded.")
}
}
Implementing Pre-Processing:
In the pre-processing step, we change the form of the input data to match what our model expects. Here, we pad the input length with a placeholder value if we have not generated a lot of user likes already.
The code is as below.
/** Given a list of selected items, preprocess to get tflite input. */
@Synchronized
private suspend fun preprocess(selectedMovies: List<Movie>): IntArray {
return withContext(Dispatchers.Default) {
val inputContext = IntArray(config.inputLength)
for (i in 0 until config.inputLength) {
if (i < selectedMovies.size) {
val (id) = selectedMovies[i]
inputContext[i] = id
} else {
// Padding input.
inputContext[i] = config.pad
}
}
inputContext
}
}
Run interpreter to generate recommendations
Now we use the model we downloaded in the previous step to run inference on our pre-processed input. We have set the type of input and output for our model and run the inference to generate our movie recommendations.
The code for the same is as below.
/** Given a list of selected items, and returns the recommendation results. */
@Synchronized
suspend fun recommend(selectedMovies: List<Movie>): List<Result> {
return withContext(Dispatchers.Default) {
val inputs = arrayOf<Any>(preprocess(selectedMovies))
// Run inference.
val outputIds = IntArray(config.outputLength)
val confidences = FloatArray(config.outputLength)
val outputs: MutableMap<Int, Any> = HashMap()
outputs[config.outputIdsIndex] = outputIds
outputs[config.outputScoresIndex] = confidences
tflite?.let {
it.runForMultipleInputsOutputs(inputs, outputs)
postprocess(outputIds, confidences, selectedMovies)
} ?: run {
Log.e(TAG, "No tflite interpreter loaded")
emptyList()
}
}
}
Implement Post Processing:
Finally, in this step, we will post- process the output from our model. The code for the same is as below.
/** Postprocess to gets results from tflite inference. */
@Synchronized
private suspend fun postprocess(
outputIds: IntArray, confidences: FloatArray, selectedMovies: List<Movie>
): List<Result> {
return withContext(Dispatchers.Default) {
val results = ArrayList<Result>()
// Add recommendation results. Filter null or contained items.
for (i in outputIds.indices) {
if (results.size >= config.topK) {
Log.v(TAG, String.format("Selected top K: %d. Ignore the rest.", config.topK))
break
}
val id = outputIds[i]
val item = candidates[id]
if (item == null) {
Log.v(TAG, String.format("Inference output[%d]. Id: %s is null", i, id))
continue
}
if (selectedMovies.contains(item)) {
Log.v(TAG, String.format("Inference output[%d]. Id: %s is contained", i, id))
continue
}
val result = Result(
id, item,
confidences[i]
)
results.add(result)
Log.v(TAG, String.format("Inference output[%d]. Result: %s", i, result))
}
results
}
}
Now, we will try and re-run the app. As we select a few movies, it should automatically download the new model and also start generating recommendations.
Finally, let us look into some of the advantages and Disadvantages of on-device Machine Learning.
Advantages of On-Device Machine Learning:
Low Latency: There is no round trip to the server and no wait for results to come back.
Privacy: The data processing happens on the user's device. This means that we can also apply Machine Learning to sensitive data which you would not want to leave your device.
Works Offline: Running ML models on-device means you can build ML-powered features that don't rely on network connectivity. In addition, as data processing happens on the device, we can reduce the usage of the user's mobile data plan.
Low Cost: As it makes use of the processing power of the device rather than maintaining additional servers or paying for cloud compute cycles this makes it cost-effective.
Limitations:
Let us also discuss some of the limitations of On-device Machine Learning.
1. Due to the nature of Machine Learning, the models that are trained can become rather large. Although this is not a problem when they run on a server, it can be limiting when running the same on a client/ Mobile device.
2. Mobile devices are more restricted with respect to storage, memory, compute resources, and power consumption limitations.
Conclusion:
Hence we can conclude that on-device models need to be much smaller than their server counterparts. Typically, that means these are less powerful. Your use case will determine whether using on-device models is a good fit or not. In this article we have seen the deployment of the model on an android device using the Android studio also we have used FireBase Analytics to analyse the data generated from the app and to recommend movies to the user's basis their likes on the app.
About the Author:- K Sumanth is a Data Science enthusiast, passionate about Data and believes that data always has a story to tell. He is persistently learning, implementing, and solving Business problems which involve complex and large data. He is known for his clear, concise, and lucid explanations on Data Science concepts. He has a PG Diploma in Data Science and Analytics from University of Texas at Austin and McCombs School of Business.


Hey there! This is a wonderful write-up. Can you please also mention further details about author. Would like to collaborate further on ML
ReplyDeleteIts mentioned in the About the Author section
DeleteHi! Thanks for updating. Can you also provide a link to connect with the author?
DeleteHi there! Please do provide a link to connect with the author.
DeleteYou can connect with him at.. https://www.linkedin.com/in/sumanthkowligi/
Delete