
1. Prerequisites
- Hardware Requirement * RAM — Min. 8GB, if you have SSD in your system then 4GB RAM would also work. * CPU — Min. Quad-core, with at least 1.80GHz
- JRE 1.8 — Offline installer for JRE
- Download Hadoop zip * I am using Hadoop-2.9.2, you can use any other STABLE version for Hadoop.
Once we have Downloaded all the above software, we can proceed with the next steps in installing the Hadoop.
2. Unzip and Install Hadoop
After Downloading the Hadoop, we need to Unzip the Hadoop-2.9.2.tar.gz file.

Once extracted, we would get a new file Hadoop-2.9.2.tar.
Now, once again we need to extract this tar file.

- Now we can organize our Hadoop installation, we can create a folder and move the final extracted file in it. For Eg. :-
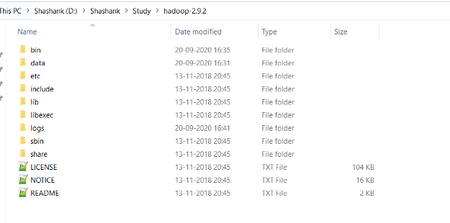
- Please note while creating folders, DO NOT ADD SPACES IN BETWEEN THE FOLDER NAME.(it can cause issues later)
- I have placed my Hadoop in D: drive you can use C: or any other drive also.
3. Setting Up Environment Variables
Another important step in setting up a work environment is to set your Systems environment variable.
To edit environment variables, go to Control Panel > System > click on the “Advanced system settings” link
Alternatively, We can Right-click on This PC icon and click on Properties and click on the “Advanced system settings” link
Or, the easiest way is to search for Environment Variable in the search bar and there you GO…😉


3.1 Setting JAVA_HOME
- Open environment Variable and click on “New” in “User Variable”

- On clicking “New”, we get the below screen.

- As shown, add JAVA_HOME in the variable name and path of Java(JDK) in Variable Value.
- Click OK and we are half done with setting JAVA_HOME.
3.2 Setting HADOOP_HOME
- Open environment Variable and click on “New” in “User Variable”

- On clicking “New”, we get the below screen.

- Now as shown, add HADOOP_HOME in variable name and path of Hadoop folder in Variable Value.
- Click OK and we are half done with setting HADOOP_HOME.
Note:- If you want the path to be set for all users you need to select “New” from System Variables.
3.3 Setting Path Variable
- The last step in setting the Environment variable is setting Path in System Variable.

- Select Path variable in the system variables and click on “Edit”.

- Now we need to add these paths to Path Variable one by one:- * %JAVA_HOME%\bin * %HADOOP_HOME%\bin * %HADOOP_HOME%\sbin
- Click OK and OK. & we are done with Setting Environment Variables.
3.4 Verify the Paths
- Now we need to verify that what we have done is correct and reflecting.
- Open a NEW Command Window
- Run following commands
echo %JAVA_HOME%
echo %HADOOP_HOME%
echo %PATH%
4. Editing Hadoop files
Once we have configured the environment variables next step is to configure Hadoop. It has 3 parts:-
4.1 Creating Folders
We need to create a folder data in the Hadoop directory, and 2 subfolders namenode and datanode


- Create DATA folder in the Hadoop directory
- Once the DATA folder is created, we need to create 2 new folders namely, namenode and datanode inside the data folder.
- These folders are important because files on HDFS resides inside the datanode.
4.2 Editing Configuration Files
Now we need to edit the following config files in Hadoop for configuring it:-
(We can find these files in Hadoop -> etc -> Hadoop)
* core-site.xml
* hdfs-site.xml
* mapred-site.xml
* yarn-site.xml
* hadoop-env.cmd
4.2.1 Editing core-site.xml
Right click on the file, select edit and paste the following content within <configuration> </configuration> tags.
Note:- Below part already has the configuration tag, we need to copy only the part inside it.
<configuration>
<property>
  <name>fs.defaultFS</name>
  <value>hdfs://localhost:9000</value>
 </property>
</configuration>
4.2.2 Editing hdfs-site.xml
Right click on the file, select edit and paste the following content within <configuration></configuration>tags.
Note:- Below part already has the configuration tag, we need to copy only the part inside it.
Also, replace PATH~1 and PATH~2 with the path of namenode and datanode folder that we created recently(step 4.1).
<configuration>
 <property>
  <name>dfs.replication</name>
  <value>1</value>
 </property>
 <property>
  <name>dfs.namenode.name.dir</name>
  <value>PATH~1\namenode</value>
  <final>true</final>
 </property>
 <property>
  <name>dfs.datanode.data.dir</name>
  <value>PATH~2\datanode</value>
  <final>true</final>
 </property>
</configuration>
4.2.3 Editing mapred-site.xml
Right click on the file, select edit and paste the following content within <configuration> </configuration> tags.
Note:- Below part already has the configuration tag, we need to copy only the part inside it.
<configuration>
 <property>
  <name>mapreduce.framework.name</name>
  <value>yarn</value>
 </property>
</configuration>
4.2.4 Editing yarn-site.xml
Right click on the file, select edit and paste the following content within <configuration> </configuration> tags.
Note:- Below part already has the configuration tag, we need to copy only the part inside it.
<configuration>
 <property>
  <name>yarn.nodemanager.aux-services</name>
  <value>mapreduce_shuffle</value>
 </property>
 <property>
  <name>yarn.nodemanager.auxservices.mapreduce.shuffle.class</name>
  <value>org.apache.hadoop.mapred.ShuffleHandler</value>
 </property>
<!-- Site specific YARN configuration properties -->
</configuration>
4.2.5 Verifying hadoop-env.cmd
Right-click on the file, select edit and check if the JAVA_HOME is set correctly or not.
We can replace the JAVA_HOME variable in the file with your actual JAVA_HOME that we configured in the System Variable.
set JAVA_HOME=%JAVA_HOME%
           OR
set JAVA_HOME="C:\Program Files\Java\jdk1.8.0_221"
4.3 Replacing bin
* Extract the zip and copy all the files present under the bin folder to %HADOOP_HOME%\bin
Note:- If you are using different version of Hadoop then please search for its respective bin folder and download it.
5. Testing Setup
Congratulation..!!!!!
We are done with setting up the Hadoop in our System.
Now we need to check if everything works smoothly…
5.1 Formatting Namenode
Before starting Hadoop we need to format the namenode for this we need to start a NEW Command Prompt and run the below command.
hadoop namenode -format

Note:- This command formats all the data in namenode. So, its advisable to use only at the start and do not use it every time while starting hadoop cluster to avoid data loss.
5.2 Launching Hadoop
Now we need to start a new Command Prompt remember to run it as administrator to avoid permission issues and execute the below commands.
start-all.cmd

This will open 4 new cmd windows running 4 different Daemons of Hadoop:-
* Namenode
* Datanode
* Resourcemanager
* Nodemanager

Note:- We can verify if all the daemons are up and running using jps command in new cmd window.
6. Running Hadoop (Verifying Web UIs)
6.1 Namenode
Open localhost:50070 in a browser tab to verify namenode health.

6.2 Resourcemanger
Open localhost:8088 in a browser tab to check resourcemanager details.

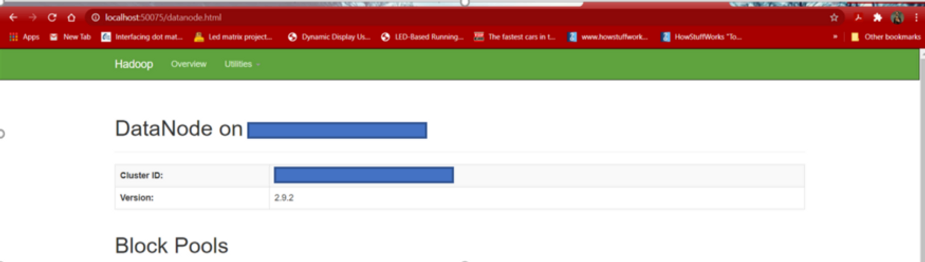
6.3 Datanode
Open localhost:50075 in a browser tab to checkout datanode.
7. Congratulations..!!!!🎉
Congratulation! We have successfully installed Hadoop.
There are chances that some of us might have faced some issues… Don’t worry it's most likely due to some small miss or incompatible software. If you face any such issue, please visit all the steps carefully and verify the right software versions.
If you still can’t get Hadoop up and running, Don’t hesitate to describe your problem below in the comment section.
Don’t forget to Like and share it with your friends and colleagues.
Also, don’t miss the opportunity to share your views and suggestions for this or new articles.
Happy Learning… !!! 🙂
can;t download the bin folder from git
ReplyDeleteHi,
DeleteNo issues, we are here to help you... Please provide your mail ID, and we will mail it to you. Also, please provide the version of your Hadoop for the winutils.