An easy to go guide for installing SQOOP in Windows 10.
 |
| Image taken from Google images |
1. Prerequisites
- Hardware Requirement
* RAM — Min. 8GB, if you have SSD in your system then 4GB RAM would also work.
* CPU — Min. Quad-core, with at least 1.80GHz - JRE 1.8 — Offline installer for JRE
- Java Development Kit — 1.8
- A Software for Un-Zipping like 7Zip or Win Rar
* I will be using 64-bit windows for the process, please check and download the version supported by your system x86 or x64 for all the software. - Hadoop
* I am using Hadoop-2.9.2, you can also use any other STABLE version for Hadoop.
* If you don’t have Hadoop, you can refer to installing it from Hadoop: How to install in 5 Steps in Windows 10. - MySQL Query Browser
- Download SQOOP zip
* I am using SQOOP-1.4.7, you can also use any other STABLE version for SQOOP.

Fig 1:- Download Sqoop 1.4.7
* RAM — Min. 8GB, if you have SSD in your system then 4GB RAM would also work.
* CPU — Min. Quad-core, with at least 1.80GHz
* I will be using 64-bit windows for the process, please check and download the version supported by your system x86 or x64 for all the software.
* I am using Hadoop-2.9.2, you can also use any other STABLE version for Hadoop.
* If you don’t have Hadoop, you can refer to installing it from Hadoop: How to install in 5 Steps in Windows 10.
* I am using SQOOP-1.4.7, you can also use any other STABLE version for SQOOP.
 |
| Fig 1:- Download Sqoop 1.4.7 |
2. Unzip and Install SQOOP
 |
| Fig 2:- Extracting Sqoop Step-1 |
Once extracted, we would get a new file sqoop-1.4.7.bin__hadoop-2.6.0.tar
Now, once again we need to extract this tar file.
 |
| Fig 3:- Extracting SQOOP Step-2 |
- Now we can organize our SQOOP installation, we can create a folder and move the final extracted file in it. For Eg. :-
 |
| Fig 4:- SQOOP Directory |
- Please note while creating folders, DO NOT ADD SPACES IN BETWEEN THE FOLDER NAME.(it can cause issues later)
- I have placed my SQOOP in D: drive you can use C: or any other drive also.
3. Setting Up Environment Variables
Another important step in setting up a work environment is to set your Systems environment variable.
To edit environment variables, go to Control Panel > System > click on the “Advanced system settings” link
Alternatively, We can Right-click on This PC icon and click on Properties and click on the “Advanced system settings” link
Or, the easiest way is to search for Environment Variable in the search bar and there you GO…😉
 |
| Fig. 5:- Path for Environment Variable |
 |
| Fig. 6:- Advanced System Settings Screen |
3.1 Setting SQOOP_HOME
- Open environment Variable and click on “New” in “User Variable”
 |
| Fig. 7:- Adding Environment Variable |
- On clicking “New”, we get the below screen.
 |
| Fig. 8:- Adding SQOOP_HOME |
- Now as shown, add SQOOP_HOME in variable name and path of SQOOP in Variable Value.
- Click OK and we are half done with setting SQOOP_HOME.
3.2 Setting Path Variable
- The last step in setting the Environment variable is setting Path in System Variable.
 |
| Fig. 9:- Setting Path Variable |
- Select Path variable in the system variables and click on “Edit”.
 |
| Fig. 10:- Adding Path |
- Now we need to add these paths to Path Variable:-
* %SQOOP_HOME%\bin - Click OK and OK. & we are done with Setting Environment Variables.
Note:- If you want the path to be set for all users you need to select “New” from System Variables.
3.3 Verify the Paths
- Now we need to verify that what we have done is correct and reflecting.
- Open a NEW Command Window
- Run following commands
4. Configure SQOOP
4.1 Installing MySQL Database
If you have already installed MySQL Database or any other Database like MySQL, PostgreSQL, Oracle, SQL Server and DB2 you can skip this step and move ahead.
I will be using MySQL Database as SQOOP includes fast-path connectors for MySQL.
4.2 Getting MySQL connector for SQOOP
lib folder of SQOOP. |
| Fig 11:- Putting MySQL jar in SQOOP lib folder |
4.3 Creating Users in MySQL
The next important step in configuring SQOOP is to create users for MySQL.
These Users are used for connecting SQOOP to MySQL Database for reading and writing data from it.
- Firstly, we need to open the MySQL Workbench and open the workspace(default or any specific, if you want). We will be using the default workspace only for now.
 |
| Fig 12:- Open MySQL Workbench |
- Now Open the
Administrationoption in the Workspace and selectUsers and privilegesoption underManagement.
 |
| Fig 13:- Opening Users and Privileges |
4.3.1 Creating SQOOP User in MySQL
- Now select
Add Accountoption and Create an new user withLogin NameassqoopandLimit to Host Mappingas thelocalhostandPasswordof your choice.
 |
| Fig 14:- Creating SQOOP User |
- Now we have to define the roles for this user under
Administrative Rolesand selectDBManager,DBDesignerandBackupAdminRoles
 |
| Fig 15:- Assigning Roles |
- Now we need to grant
schema privilegesfor the user by usingAdd Entryoption and selecting theschemaswe need access to.
 |
| Fig 16:- Schema Privileges |
I am usingschema matching patternas%_bigdata%for all my bigdata related schemas. You can use other 2 options also.
- After clicking
OKwe need to select All the privileges for this schema.
 |
| Fig 17:- Select All privileges in the schema |
- Click Apply and we are done with the creating SQOOP user.
4.3.2 Creating Hive User in MySQL
- We need to create one more user
hivein MySQL. - We can follow the same steps as above(4.3.1) for creating a new user.
4.4 Granting permission to Users
Once we have created the 2 users the next step is to Grant All privileges to these users for all the Tables in the previously selected Schema.
- Open the MySQL cmd Window. We can open it by using the Window’s Search bar.
 |
| Fig 18:- MySQL cmd |
- Upon opening it will ask for your user password(created while setting up MySQL).
- Now we need to run the below command in the cmd window one by one.
grant all privileges on test_bigdata.* to 'hive'@'localhost';
test_bigdata will be your schema name and sqoop@localhost and hive@localhost will be the user name @ Hostname.5. Testing Setup
Congratulation..!!!!!
We are done with setting up the SQOOP in our System.
Now we need to check if everything works smoothly…
Open a cmd window, run the below command to test the connection and SQOOP.
sqoop user password once provided it will show the list of databases.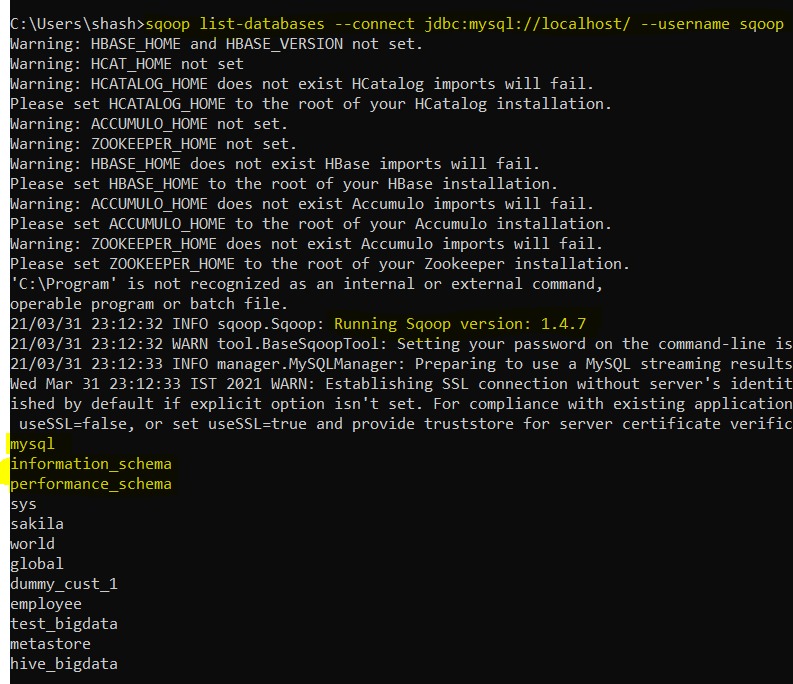 |
| Fig 19:- Running SQOOP |
6. Congratulations..!!!!🎉
There are chances that some of us might have faced some issues… Don’t worry it's most likely due to some small miss or incompatible software. If you face any such issue please visit all the steps once again carefully and verify for the right software versions.
If you still can’t get SQOOP up and running, Don’t hesitate to describe your problem below in the comment section.
7. Special Note
Also, don’t miss the opportunity to share your views and suggestions for this or new articles.
Learn Hadoop Installation in 5 steps
Learn Hive Installation in 5 steps
Learn Pig Installation in 5 steps
Learn Spark Installation in 5 steps
Happy Learning… !!! 🙂
Hi,
ReplyDeletei just successfully installed first hadoop and then sqoop following your instructions.
After installing Sqoop i checked all environment variables and tried to check sqoop.
the variables are OK but when i run %SQOOP_HOME%\bin\sqoop.cmd version to check the sqoop version as mentioned in
https://kontext.tech/article/262/install-apache-sqoop-in-windows
it fails:
C:\Users\iamme>sqoop version
Warning: HBASE_HOME and HBASE_VERSION not set.
Warning: HCAT_HOME not set
Warning: HCATALOG_HOME does not exist HCatalog imports will fail.
Please set HCATALOG_HOME to the root of your HCatalog installation.
Warning: ACCUMULO_HOME not set.
Warning: ZOOKEEPER_HOME not set.
Warning: HBASE_HOME does not exist HBase imports will fail.
Please set HBASE_HOME to the root of your HBase installation.
Warning: ACCUMULO_HOME does not exist Accumulo imports will fail.
Please set ACCUMULO_HOME to the root of your Accumulo installation.
Warning: ZOOKEEPER_HOME does not exist Accumulo imports will fail.
Please set ZOOKEEPER_HOME to the root of your Zookeeper installation.
Error: Could not find or load main class org.apache.sqoop.Sqoop
Caused by: java.lang.ClassNotFoundException: org.apache.sqoop.Sqoop
any clue what might be wrong?
Best Regards,
R.S.
Hi,
DeleteCan you please follow the steps mentioned above in the post and let us know.
The post you shared has some details missing in it which is causing the issue.
Regards,
Team QDS
quickdatascienceds@gmail.com