< Previous Partitioning in Hive
We studied the theory part involved in Partitioning in Hive in our previous article. Time to get our hands dirty now.
We will be following the below pattern for the Coding part:-
1. Hadoop Installation.
2. Hive Installation.
3. Static Partitioning. {The theory part is covered in the previous article.}
4. Dynamic Partitioning. {The theory part is covered in the previous article.}
Hope we have installed, and have Hadoop and Hive running.
1. Static Partitioning
A. Creating a Partition table
CREATE TABLE IF NOT EXISTS <Table Name> (<Column1 DataType>, <Column2 DataType>,<Column3 DataType>,... )
PARTITIONED BY (<Partition Column DataType>)
ROW FORMAT DELIMITED
FIELDS TERMINATED BY ','
LINES TERMINATED BY '\n'
STORED AS <file format>;
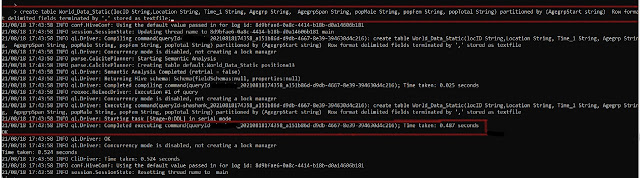 |
| Creating Partitioning Table |
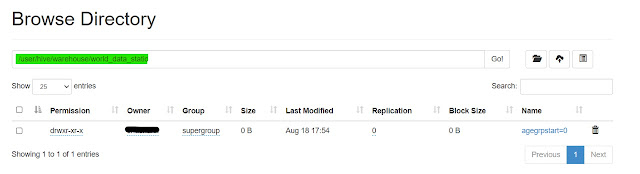
 |
| Table in HDFS |
B. Inserting/ Loading Data in Partitions
We can Load/Insert Data into the Partition table in two ways:-
i. Using a Base table having un-partitioned data to insert data into the Partitioned table.
INSERT INTO TABLE <Table Name>
PARTITION(<Partition Column> = <Partiton Value>)
SELECT Column1 ,Column2, Column3,...
FROM <Base Table>
WHERE <Partition Column> = <Partiton Value> ;
 |
| Static Insert Command |
 |
| Data in HDFS |
ii. Loading data directly from separate files
We can also Load data directly, but we need to take care that data should be separated properly on the partition column, i.e. we can use separate files to load the data in partitioned tables separately.
LOAD DATA LOCAL INPATH <File Path>
INTO TABLE <Table Name>
PARTITION(<Partition Column> = <Partiton Value>);
C. Adding a Partition
Again we can use three different ways to Add a Partition:-
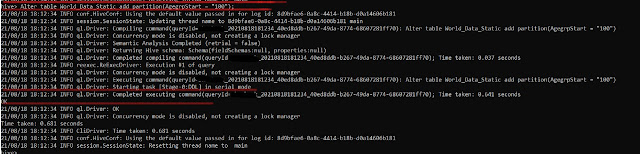
i. Adding a partition together with Data.
For this, we need to specify the location of the file at the time of Adding Partition
ALTER TABLE <Table Name>
ADD PARTITION (<Partition Column> = <Partiton Value>)
LOCATION <HDFS Directory Location>;
 |
| Adding a partition together with Data. |
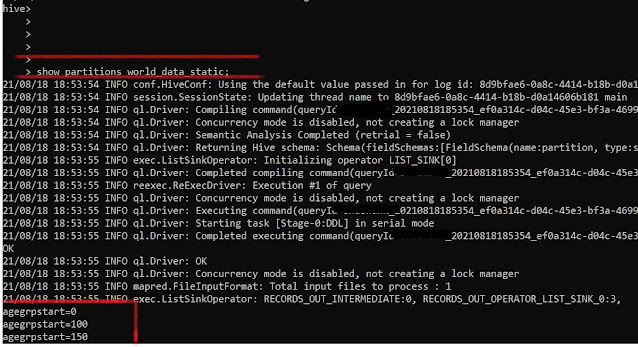
We can check the Partitions using the "Show Partitions <Table Name>" command.
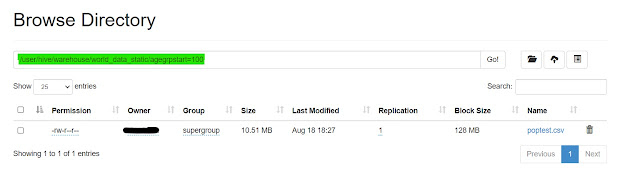
ii. Adding a Partition before Loading the data.
We need to create an empty partition and then load the data.
ALTER TABLE <Table Name>
ADD PARTITION (<Partition Column> = <Partiton Value>);
 |
Alter Adding a Partititon
|
LOAD DATA LOCAL INPATH <File Path>
INTO TABLE <Table Name>
PARTITION(<Partition Column> = <Partiton Value>);
 |
| Loading Data in Partition |
 |
| Data Loaded in Partition |
iii. Creating Partition Manually in HDFS.
We can also create a partition directly in HDFS, using the mkdir command.
hdfs dfs -mkdir hdfs://localhost:9000/dir/"HDFSpartition"
 |
| Creating Partition Manually in HDFS |
Using this method has a problem, Hive will not be able to show this Partition by running the
"SHOW PARTITIONS <Table Name>;"
command. This is due to Hive reads data from its metastore which has all the metadata about the data stored in Hive. So, when we create a partition directly in HDFS, metastore is unaware of it hence Hive doesn't read it.
 |
| SHOW PARTITIONS |
We can only see the previous 3 Partitions that we created, the "agegrpstart =200" partition is not visible here.
To resolve this we can use two ways:-
1. Add Partition Manually in Hive.
Any one of the two methods that are discussed earlier to alter/add a partition.
2. Repair Table
Execute MSCK REPAIR TABLE <Table Name>;
This will repair and add all the partitions in the metastore.
D. Renaming a Partition
Another action that we can perform over partitions is to Rename a partition
ALTER TABLE <Table Name> PARTITION(<Partition Column> = <Partiton Value Old>) RENAME TO PARTITION (<Partition Column > = <Partiton Value New>);
E. Deleting a Partition
We can also delete a partition if it is not required.
ALTER TABLE <Table Name> DROP [IF EXISTS] PARTITION <Partition Name1>, PARTITION <Partition Name2>,...;
F. Importance of "Strict" Mode.
hive.mapred.mode=strict
=> this mode restrict certain performance-intensive operations Eg:- It restricts queries without WHERE clause on partitioned tables.
=> By using this mode, we can block the full table scan if the table is very large.
=> An ORDER BY operation without LIMIT clause is restricted.
2. Dynamic Partitioning
Dynamic Partitioning is a bit tricky and requires a particular set of steps to be followed for the same.
An Important point to remember here is that the column to be used for dynamic partitioning has to be the last column in our dataset.
Don't worry if you don't have so, We are going to consider the scenario where we do not have the last column as the partition column for partitioning.
A. Creating a simple Hive table.
Firstly, we need to create simple hive data.
CREATE TABLE IF NOT EXISTS <Table Name> (<Column1 DataType>, <Column2 DataType>,<Column3 DataType>,... )
ROW FORMAT DELIMITED
FIELDS TERMINATED BY ','
LINES TERMINATED BY '\n'
STORED AS <file format>;
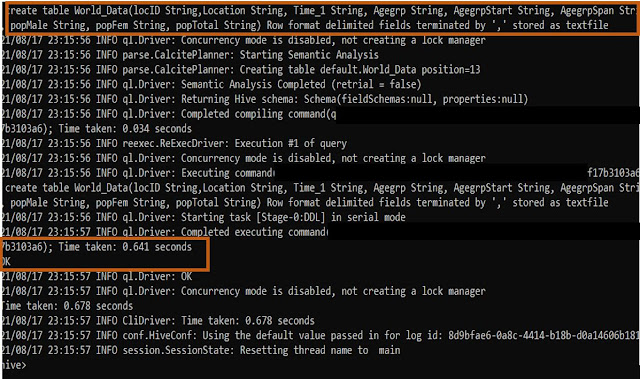 |
| Create table |
B. Insert/Load the Raw Data
 |
| Load Command |
LOAD DATA LOCAL INPATH <Raw Data File Path> INTO TABLE <Table Name>;
We can check if data has been loaded successfully or not using localhost:50070
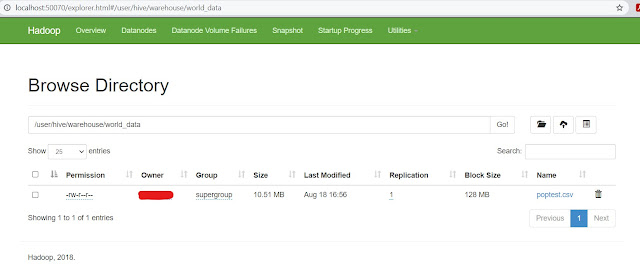 |
| Checking Data |
C. Creating a Partitioned Table
This step remains the same for both static and dynamic partitions.
CREATE TABLE IF NOT EXISTS <Table Name> (<Column1 DataType>, <Column2 DataType>,<Column3 DataType>,... )
PARTITIONED BY (<Partition Column DataType>)
ROW FORMAT DELIMITED
FIELDS TERMINATED BY ','
LINES TERMINATED BY '\n'
STORED AS <file format>;
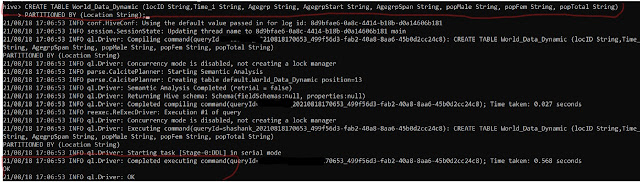 |
| Creating Partitioning table |
D. Changing Hive Setting
This is a very important step, if missed can cause the error and won't create dynamic partitions.
Here, we need to change the default "Strict" mode of Hive to "NonStrict" and set Dynamic partitioning to "True".
set hive.exec.dynamic.partition.mode=nonstrict
set hive.exec.dynamic.partition=true
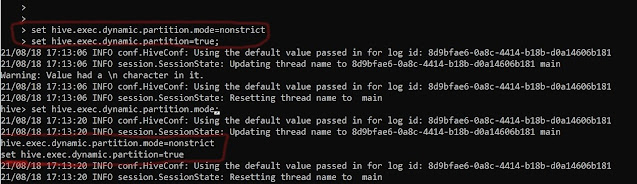 |
| Changing Mode in Hive |
I have attached the property tag for the same present in hive-site.xml
<property>
<name>hive.exec.dynamic.partition.mode</name>
<value>strict</value>
<description>
In strict mode, the user must specify at least one static partition in case the user accidentally overwrites all partitions.
In nonstrict mode all partitions are allowed to be dynamic.
</description>
</property>
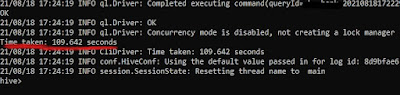
E. Loading data in Partitioned table.
Here comes the magic part. Unlike Static partitioning we do not need to create and load separate partitions here, rather we simply need to execute the below command and Hive will automatically create partitions for all the unique columns.
INSERT OVERWRITE TABLE <Partition Table Name> PARTITION(<Partition Column>)
SELECT Column1 ,Column2, Column3,Partition Column FROM <Raw Data Table>;
 |
| Dynamically Partitioning the data |
It will take some time to complete depending upon the size of our data. Once done we can check the partitions created in the HDFS Directory from the WebUI.
 |
| Completed Dynamic Partition |
It took around 109 seconds to create 199 partitions based on countries in our case. We can check these partitions individually from the HDFS directory.
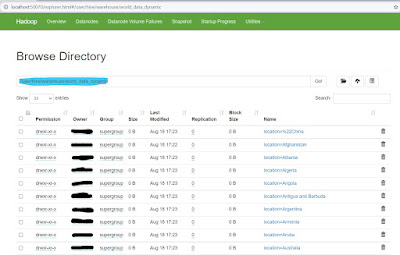 |
| Checking Dynamic Partitions |
If we want to check the data we can download the part files from each partition and check. OR we can run a select query in Hive to verify the same.
Summary
We learned the code involved behind the static and dynamic partitioning in Hive. We saw different ways and operations that we can perform over the partitions.
Its right said:- "Practice Makes a Man Perfect"
So don't just read practice along with us and let us know the issues and challenges if you face any.
Until Then... This is Quick Data Science Team signing off. See you with another article.

Comments
Post a Comment